Wednesday, August 12, 2015
Retired Certification Exams
Here you can check for the Cisco retired exams.
http://www.cisco.com/web/learning/exams/retired.html
Cisco IP Phone 8811_8841_8851_8861 Administration

Basic Reset
Performing a basic reset of a Cisco IP Phone provides a way to recover if the phone experiences an error and provides a way to reset or restore various configuration and security settings.
The following table describes the ways to perform a basic reset. You can reset a phone with any of these operations after the phone has started up. Choose the operation that is appropriate for your situation.
Operation
|
Action
|
Explanation
|
|---|---|---|
Restart phone
|
Press Services, Applications, or Directoriesand then press **#**.
|
Resets any user and network setup changes that you have made, but that the phone has not written to its Flash memory, to previously saved settings, then restarts the phone.
|
Reset settings
|
To reset settings, press Applications and choose .
|
Resets user and network setup settings to their default values, and restarts the phone.
|
To reset the CTL file, press Applications and choose .
|
Resets the CTL file.
|
Perform Factory Reset from Phone Keypad
Procedure
mRemoteNG Serial Connection
mRemoteNG Serial Connection
Its is impossible to simply create a serial connection on mRemoteNG ( a least at 1.67 version) so there is a tip to do that.
1 Using Putty Session
- Download putty.exe and copy it so somewhere ( example to "C:\1")
- Open putty.exe, create Serial Connection, and save it.Dont forget to choose baud rate ( example "COM_9600")
- Open mRemoteNG go to external tools (Tools-External Tools), create new external tool ( example "PTTY_9600")
- At the filename write path+filename ( example "C:\1\putty.exe")
- At the argumets write putty.exe -load "CONNECTION_NAME) ( example "putty.exe -load "COM_9600")
- Choose "Try to integrate" Option
- Create new connection and in the protocol filed choose "Ext. App" then External tool "PTTY_9600" ( external tool name)
2 - Using TeraTerm
- install teratem ( i use v 4.70)
- Create external tool, name it ( example TTRM_9600)
- At the filename write path+filename ( example "C:\Program Files\teraterm\ttermpro.exe")
- At the argumets write "ttermpro.exe /BAUD=9600 /C=1"
(/BAUD is baud rate and /C is COM port number)
- Choose "Try to integrate" Option
- Create new connection and in the protocol filed choose "Ext. App" then External tool "TTRM_9600" ( external tool name)
Enjoy!
mRemoteNG FileZilla SFTP
How to integrate FileZilla SFTP support in mRemoteNG.
First open up mRemoteNG then press “tools” and then “External Tools”

Right click and select “New External Tool”

In the External Tools Properties tab, enter the following:
Filename: C:\Program Files (x86)\FileZilla FTP Client\filezilla.exe
Arguments: sftp://%Username%:%Password%@%Hostname%:%port%

After that you should be all set, just right click the connection you want to connect via STFP and FileZilla should automatically open.
First open up mRemoteNG then press “tools” and then “External Tools”
Right click and select “New External Tool”
In the External Tools Properties tab, enter the following:
Filename: C:\Program Files (x86)\FileZilla FTP Client\filezilla.exe
Arguments: sftp://%Username%:%Password%@%Hostname%:%port%
After that you should be all set, just right click the connection you want to connect via STFP and FileZilla should automatically open.
Thursday, April 16, 2015
Windows 8.1/Windows Server 2012R2 virtual machines fail with a blue screen and report the error: CRITICAL_STRUCTURE_CORRUPTION (2060019)
Applied workaround and confirmed working!
http://kb.vmware.com/selfservice/microsites/search.do?language=en_US&cmd=displayKC&externalId=2060019
http://kb.vmware.com/selfservice/microsites/search.do?language=en_US&cmd=displayKC&externalId=2060019
Windows 8.1/Windows Server 2012R2 virtual machines fail with a blue screen and report the error: CRITICAL_STRUCTURE_CORRUPTION (2060019)
Wednesday, April 15, 2015
VMware ESXi Release and Build Number History
http://www.virten.net/vmware/esxi-release-build-number-history/#esxi5.0
[Last Update: April 9, 2015] –
Please note that this is not an official list by VMware. All informations are based on VMware documentation. Some informations or versions are not consistent.
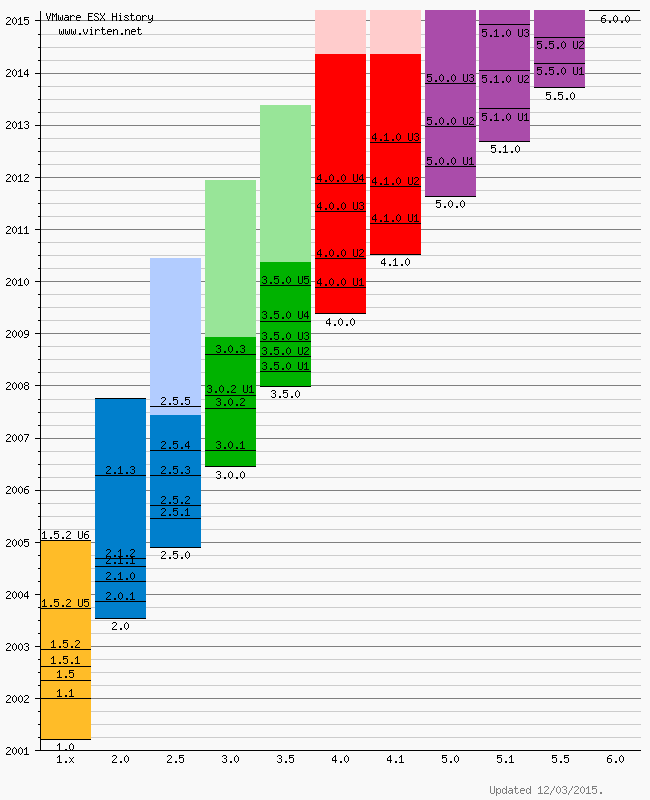
VMware ESXi Release and Build Number History
The following listings are a comprehensive collection of the flagship hypervisor product by VMware. All bold versions are downloadable releases. All patches have been named by their release names. Please note that the ESXi hypervisor was first available with version 3.5.[Last Update: April 9, 2015] –
- vSphere ESXi 6.0
- vSphere ESXi 5.5
- vSphere ESXi 5.1
- vSphere ESXi 5.0
- vSphere ESXi 4.1
- vSphere ESXi 4.0
- ESXi 3.5
- VMware ESX History Diagram
- Download PDF Version
vSphere ESXi 6.0
| Name | Version | Release | Build |
|---|---|---|---|
| ESXi600-201504001 | 2015-04-09 | 2615704 | |
| VMware ESXi 6.0 | ESXi 6.0 GA | 2015-03-12 | 2494585 |
vSphere ESXi 5.5
| Name | Version | Release | Build |
|---|---|---|---|
| ESXi550-201504001 | 2015-04-07 | 2638301 | |
| ESXi550-201502001 | ESXi 5.5 Express Patch 6 | 2015-02-05 | 2456374 |
| ESXi550-201501001 | ESXi 5.5 Patch 4 | 2015-01-27 | 2403361 |
| ESXi550-201412001 | ESXi 5.5 Express Patch 5 | 2014-12-02 | 2302651 |
| ESXi550-201410001 | ESXi 5.5 Patch 3 | 2014-10-15 | 2143827 |
| VMware ESXi 5.5 Update 2 | ESXi 5.5 Update 2 | 2014-09-09 | 2068190 |
| ESXi550-201407001 | ESXi 5.5 Patch 2 | 2014-07-01 | 1892794 |
| ESXi550-201406001 | ESXi 5.5 Express Patch 4 | 2014-06-10 | 1881737 |
| ESXi550-201404020 | ESXi 5.5 Express Patch 3 | 2014-04-19 | 1746974 |
| ESXi550-201404001 | ESXi 5.5 Update 1a | 2014-04-19 | 1746018 |
| VMware ESXi 5.5.1 Driver Rollup | 2014-03-11 | 1636597 | |
| VMware ESXi 5.5 Update 1 | ESXi 5.5 Update 1 | 2014-03-11 | 1623387 |
| ESXi550-201312001 | ESXi 5.5 Patch 1 | 2013-12-22 | 1474528 |
| vSAN Beta Refresh | 2013-11-25 | 1439689 | |
| VMware ESXi 5.5 | ESXi 5.5 GA | 2013-09-22 | 1331820 |
vSphere ESXi 5.1
| Name | Version | Release | Build |
|---|---|---|---|
| ESXi510-201503001 | 5.1.0 Patch 7 | 2015-03-26 | 2583090 |
| VMware ESXi 5.1 Update 3 | 5.1.0 U3 | 2014-12-04 | 2323236 |
| ESXi510-201410001 | 5.1.0 Patch 6 | 2014-10-31 | 2191751 |
| ESXi510-201407001 | 5.1.0 Patch 5 | 2014-07-31 | 2000251 |
| ESXi510-201406001 | 5.1.0 Express Patch 5 | 2014-06-17 | 1900470 |
| ESXi510-201404001 | 5.1.0 Patch 4 | 2014-04-29 | 1743533 |
| ESXi510-201402001 | 5.1.0 Express Patch 4 | 2014-02-27 | 1612806 |
| VMware ESXi 5.1 Update 2 | 5.1.0 U2 | 2014-01-16 | 1483097 |
| ESXi510-201310001 | 5.1.0 Patch 3 | 2013-10-17 | 1312873 |
| ESXi510-201307001 | 5.1.0 Patch 2 | 2013-07-25 | 1157734 |
| ESXi510-201305001 | 5.1.0 Express Patch 3 | 2013-05-22 | 1117900 |
| VMware ESXi 5.1 Update 1 | 5.1.0 U1 | 2013-04-25 | 1065491 |
| ESXi510-201303001 | 5.1.0 Express Patch 2 | 2013-03-07 | 1021289 |
| ESXi510-201212001 | 5.1.0 Patch 1 | 2012-12-20 | 914609 |
| ESXi510-201210001 | 5.1.0a | 2012-10-24 | 838463 |
| KB2034796 | 5.1.0 | Hot-Patch | 837262 |
| VMware ESXi 5.1 | 5.1.0 GA | 2012-09-11 | 799733 |
vSphere ESXi 5.0
| Name | Version | Release | Build |
|---|---|---|---|
| ESXi500-201502001 | 2015-02-26 | 2509828 | |
| ESXi500-201412001 | 5.0.0 Patch 10 | 2014-12-04 | 2312428 |
| ESXi500-201408001 | 5.0.0 Patch 9 | 2014-08-28 | 2000308 |
| ESXi500-201407001 | 5.0.0 Express Patch 6 | 2014-07-01 | 1918656 |
| ESXi500-201405001 | 5.0.0 Patch 8 | 2014-05-29 | 1851670 |
| ESXi500-201401001 | 5.0.0 Patch 7 | 2014-01-23 | 1489271 |
| VMware ESXi 5.0 Update 3 | 5.0.0 U3 | 2013-10-17 | 1311175 |
| ESXi500-201308001 | 5.0.0 Patch 6 | 2013-08-29 | 1254542 |
| ESXi500-201305001 | 5.0.0 Express Patch 5 | 2013-05-15 | 1117897 |
| ESXi500-201303001 | 5.0.0 Patch 5 | 2013-03-28 | 1024429 |
| VMware ESXi 5.0 Update 2 | 5.0.0 U2 | 2012-12-20 | 914586 |
| ESXi500-201209001 | 5.0.0 Patch 4 | 2012-09-27 | 821926 |
| ESXi500-201207001 | 5.0.0 Patch 3 | 2012-07-12 | 768111 |
| ESXi500-201206001 | 5.0.0 Express Patch 4 | 2012-06-14 | 721882 |
| ESXi500-201205001 | 5.0.0 Express Patch 3 | 2012-05-03 | 702118 |
| ESXi500-201204001 | 5.0.0 Express Patch 2 | 2012-04-12 | 653509 |
| VMware ESXi 5.0 Update 1 | 5.0.0 U1 | 2012-03-15 | 623860 |
| ESXi500-201112001 | 5.0.0 Patch 2 | 2011-12-15 | 515841 |
| ESXi500-201111001 | 5.0.0 Express Patch 1 | 2011-11-03 | 504890 |
| ESXi500-201109001 | 5.0.0 Patch 1 | 2011-09-13 | 474610 |
| VMware ESXi 5.0 | 5.0.0 | 2011-08-24 | 469512 |
vSphere ESXi 4.1
| Name | Version | Release | Build |
|---|---|---|---|
| ESXi410-201404001 | 4.1.0 Patch 11 | 2014-04-10 | 1682698 |
| ESXi410-201312001 | 4.1.0 Patch 10 | 2013-12-05 | 1363503 |
| ESXi410-201307001 | 4.1.0 Patch 9 | 2013-07-31 | 1198252 |
| ESXi410-201304001 | 4.1.0 Patch 8 | 2013-04-30 | 1050704 |
| ESXi410-201301001 | 4.1.0 Patch 7 | 2013-01-31 | 988178 |
| ESXi410-201211001 | 4.1.0 Patch 6 | 2012-11-15 | 874690 |
| VMware ESXi 4.1 Update 3 | 4.1.0 U3 | 2012-08-30 | 800380 |
| ESXi410-201206001 | 4.1.0 Express Patch 3 | 2012-06-14 | 721871 |
| ESXi410-201205001 | 4.1.0 Express Patch 2 | 2012-05-03 | 702113 |
| ESXi410-201204001 | 4.1.0 Patch 5 | 2012-04-26 | 659051 |
| ESXi410-201201001 | 4.1.0 Patch 4 | 2012-01-30 | 582267 |
| VMware ESXi 4.1 Update 2 | 4.1.0 U2 | 2011-10-27 | 502767 |
| ESXi410-201107001 | 4.1.0 Patch 3 | 2011-07-28 | 433742 |
| ESXi410-201104001 | 4.1.0 Patch 2 | 2011-04-28 | 381591 |
| VMware ESXi 4.1 Update 1 | 4.1.0 U1 | 2011-02-10 | 348481 |
| ESXi410-201011001 | 4.1.0 Express Patch 1 | 2010-11-29 | 320137 |
| ESXi410-201010001 | 4.1.0 Patch 1 | 2010-11-15 | 320092 |
| VMware ESXi 4.1 | 4.1.0 | 2010-07-13 | 260247 |
vSphere ESXi 4.0
| Name | Version | Release | Build |
|---|---|---|---|
| ESXi400-201404001 | 4.0.0 Patch 20 | 2014-04-10 | 1682696 |
| ESXi400-201310001 | 4.0.0 Patch 19 | 2013-10-24 | 1335992 |
| ESXi400-201305001 | 4.0.0 Patch 18 | 2013-05-30 | 1070634 |
| ESXi400-201302001 | 4.0.0 Patch 17 | 2013-02-07 | 989856 |
| ESXi400-201209001 | 4.0.0 Patch 16 | 2012-09-14 | 787047 |
| ESXi400-201206001 | 4.0.0 Patch 15 | 2012-06-12 | 721907 |
| ESXi400-201205001 | 4.0.0 Patch 14 | 2012-05-03 | 702116 |
| ESXi400-201203001 | 4.0.0 Patch 13 | 2012-03-30 | 660575 |
| VMware ESXi 4.0 Update 4 | 4.0.0 U4 | 2011-11-17 | 504850 |
| ESXi400-201110001 | 4.0.0 Patch 12 | 2011-10-13 | 480973 |
| VMware ESXi 4.0 Update 3 | 4.0.0 U3 | 2011-05-05 | 398348 |
| ESXi400-201104001 | 4.0.0 Patch 11 | 2011-04-28 | 392990 |
| ESXi400-201103001 | 4.0.0 Patch 10 | 2011-03-07 | 360236 |
| ESXi400-201101001 | 4.0.0 Patch 9 | 2011-01-04 | 332073 |
| ESXi400-201009001 | 4.0.0 Patch 8 | 2010-09-30 | 294855 |
| VMware ESXi 4 Update 2 | 4.0.0 U2 | 2010-06-10 | 261974 |
| ESXi400-201005001 | 4.0.0 Patch 7 | 2010-05-27 | 256968 |
| ESXi400-201003001 | 4.0.0 Patch 6 | 2010-04-01 | 244038 |
| ESXi400-201002001 | 4.0.0 Patch 5 | 2010-03-03 | 236512 |
| ESXi400-200912001 | 4.0.0 Patch 4 | 2010-01-05 | 219382 |
| VMware ESXi 4 Update 1 | 4.0.0 U1 | 2009-11-19 | 208167 |
| ESXi400-200909001 | 4.0.0 Patch 3 | 2009-09-24 | 193498 |
| ESXi400-200907001 | 4.0.0 Patch 2 | 2009-08-06 | 181792 |
| ESXi400-200906001 | 4.0.0 Patch 1 | 2009-07-09 | 175625 |
| VMware ESXi 4 | 4.0.0 | 2009-05-21 | 164009 |
ESXi 3.5
| Name | Version | Release | Build |
|---|---|---|---|
| ESXe350-201302401-O-SG | 3.5 Patch 27 | 2013-2-21 | 988599 |
| ESXe350-201206401-O-SG | 3.5 Patch 26 | 2012-06-14 | 725354 |
| ESXe350-201205401-O-SG | 3.5 Patch 25 | 2012-05-03 | 702112 |
| ESXe350-201203401-O-SG | 3.5 Patch 24 | 2012-03-09 | 604481 |
| VMware ESXi 3.5 June 2011 Rollup | 3.5 June 2011 Rollup | 2011-06-30 | 391406 |
| ESXe350-201105401-O-SG | 3.5 Patch 23 | 2011-06-02 | 391406 |
| ESXe350-201012401-O-BG | 3.5 Patch 22 | 2010-12-07 | 317866 |
| ESXe350-201008401-O-SG | 3.5 Patch 21 | 2010-09-01 | 283373 |
| ESXe350-201006401-O-SG | 3.5 Patch 20 | 2010-06-24 | 259926 |
| ESXe350-201003401-O-BG | 3.5 Patch 19 | 2010-03-29 | 238493 |
| ESXe350-201002401-O-SG | 3.5 Patch 18 | 2010-02-16 | 226117 |
| ESXe350-200912401-O-BG | 3.5 Patch 17 | 2009-12-29 | 213532 |
| VMware ESXi 3.5 Update 5 | 3.5 U5 | 2009-12-03 | 207095 |
| ESXe350-200910401-I-SG | 3.5 Patch 16 | 2009-10-16 | 199239 |
| ESXe350-200908401-I-BG | 3.5 Patch 15 | 2009-08-31 | 184236 |
| ESXe350-200907401-I-BG | 3.5 Patch 14 | 2009-07-30 | 176894 |
| ESXe350-200906401-I-BG | 3.5 Patch 13 | 2009-06-30 | 169697 |
| ESXe350-200905401-I-BG | 3.5 Patch 12 | 2009-05-28 | 163429 |
| ESXe350-200904401-I-SG | 3.5 Patch 11 | 2009-04-29 | 158874 |
| VMware ESXi 3.5 Update 4 | 3.5 U4 | 2009-03-30 | 153875 |
| ESXe350-200903411-I-BG | 3.5 Patch 10 | 2009-03-20 | 153480 |
| ESXe350-200901401-I-SG | 3.5 Patch 9 | 2009-01-30 | 143129 |
| ESXe350-200811401-I-SG | 3.5 Patch 8 | 2008-12-02 | 130755 |
| VMware ESXi 3.5 Update 3 | 3.5 U3 | 2008-11-06 | 123629 |
| ESXe350-200809401-I-SG | 3.5 Patch 7 | 2008-10-03 | 120505 |
| ESXe350-200808501-I-SG | 3.5 Patch 6 | 2008-09-18 | 113338 |
| VMware ESXi 3.5 Update 2 (reissued) | 3.5 U2 | 2008-08-13 | 110271 |
| ESXe350-200807812-I-BG | 3.5 Patch 5 | 2008-08-12 | 110180 |
| VMware ESXi 3.5 Update 2 (timebombed) | 3.5 U2 | 2008-07-25 | 103909 |
| ESXe350-200805501-I-SG | 3.5 Patch 4 | 2008-06-03 | 94430 |
| ESXe350-200804401-O-BG | 3.5 Patch 3 | 2008-04-30 | 85332 |
| VMware ESXi 3.5 Update 1 | 3.5 U1 | 2008-04-10 | 82664 |
| ESXe350-200802401-I-BG | 3.5 Patch 2 | 2008-03-10 | 76563 |
| ESXe350-200712401-O-BG | 3.5 Patch 1 | 2008-01-17 | |
| VMware ESXi 3.5 Initial Release | 3.5 | 2008-01-10 | 70348 |
| VMware ESXi 3.5 First Public Release | 3.5 | 2007-12-31 | 67921 |
VMware ESX History Diagram
Please note that this is not an official list by VMware. All informations are based on VMware documentation. Some informations or versions are not consistent.
Manually Download VMware Tools ISO Image
This post is to share the
information about How to manually download the VMware tools for various
Operation system based on VMware vSphere versions. VMware tools varies
for each and every operating system. When we try to install or Upgrade
VMware tools using vSphere client, It will automatically mount the
associated VMware tools ISO into virtual CD ROM drive of your virtual
machine based on the Guest Operating system of the virtual machine. If
in case you face any problem with mounting VMware tools ISO image to the
virtual machine using vSphere client, you can manually download the
VMware tools from the VMware website and install it manually.


You can even download the complete list of VMware tools available
for various operating systems and place it in your organization
repository to be used by administrators. It will make your job easy.
VMware tools helps to optimize the performance of your virtual machine
using ESX/ESXi hypervisor resource management mechanisms.
Using the above link you can Select the version of vSphere to download the VMware tools. I have Selected ESXi 5.1 U1
After
selecting the ESX/ESXi version, It will allow us to select the Operating
system to download the respective VMware tools version
I have selected Windows in the above section and intern it will ask
you to select either 32 bit or 64 bit of VMware tools version for the
windows operating system.
Choose
either X64 or X86 based on your operating system of the Virtual Machine.
It will allow you to download VMware tools .exe file and also VMware
tools ISO image.
Thats it.
You are done with the manual download of VMware tools for your guest
operating system. I hope this post is informative for you. Thanks for
Reading !!!
Monday, March 30, 2015
High Disk Space is being consumed by C:\Program Files\Symantec\Symantec Endpoint Protection Manager\data\outbox\Importpackage
. Delete all files from %installlocation%\Symantec\Symantec Endpoint
Protection Manager\data\outbox\ImportPackage folder. (without stopping
any services)
2. Delete everything older than today's date in %installlocation%\Symantec\Symantec Endpoint Protection Manager\Inetpub\content (also without stopping any services)
3. In the Symantec Admin Console go to Admin > Servers > localhost. Right-click localhost and truncate the transaction logs.
Symantec has released new version of Symantec Endpoint Protection. English versions of Symantec Endpoint Protection 12.1.5337.5000 (RU5) is now available.
It has new content storage optimization feature:
As part of the upgrade to SEPM 12.1 RU5, the SEPM converts all of the content from full definitions to delta definitions. This process is resource intensive and may take an extended period of time. After this process is completed, the SEPM will use significantly less disk space.
In a typical enterprise setup where 30 content revisions stored, the SEPM upgrade process must reduce 55GB of full content to under 2GB of delta content. This process requires significant resources to complete and is impacted by the performance of any available CPUs, CPU cores (physical/logical/hyperthreading), memory, and disks (I/O). On a server that performs multiple roles, stores larger numbers of content, or is otherwise resource constrained, this process may take a longer duration to complete.
Refer this article to find more info: The LiveUpdate content optimization and content storage space optimization steps take a long time to complete when upgrading to Symantec Endpoint Protection Manager 12.1 RU5
http://www.symantec.com/docs/TECH224055
Thursday, March 12, 2015
vCenter Server Appliance: Troubleshooting full database partition
A customer of mine had within 6 months
twice a full database partition on a VMware vCenter Server
Appliance. After the first outage, the customer increased the size of
the partition which is mounted to /storage/db. Some months later, some
days ago, the vCSA became unresponsive again. Again because of a filled
up database partition. The customer increased the size of the database
partition again (~ 200 GB!!) and today I had time to take a look at
this nasty vCSA.
The situation

Within 2 days, the storage usage of the databse increased from 75% to 77%. First, I checked the size of the database:
|
1
2
3
4
5
6
7
8
9
10
11
12
13
14
|
vcsa:/opt/vmware/vpostgres/current/bin # /opt/vmware/vpostgres/current/bin/psql -h localhost -U vc VCDB
psql.bin (9.0.17)
Type "help" for help.
VCDB=> SELECT pg_database.datname, pg_size_pretty(pg_database_size(pg_database.datname)) AS size FROM pg_database;
datname | size
-----------+---------
template1 | 5353 kB
template0 | 5345 kB
postgres | 5449 kB
VCDB | 2007 MB
(4 rows)
VCDB=>
|
As you can see, the database had only 2 GB. The pg_log directory was more interesting:
|
1
2
3
4
5
6
7
8
9
10
11
12
13
14
15
16
17
18
19
20
|
vcsa:/storage/db/vpostgres # du -shc /storage/db/vpostgres/*
4.0K /storage/db/vpostgres/PG_VERSION
2.0G /storage/db/vpostgres/base
704K /storage/db/vpostgres/global
47M /storage/db/vpostgres/pg_clog
4.0K /storage/db/vpostgres/pg_hba.conf
4.0K /storage/db/vpostgres/pg_ident.conf
<strong>141G /storage/db/vpostgres/pg_log</strong>
252K /storage/db/vpostgres/pg_multixact
12K /storage/db/vpostgres/pg_notify
324K /storage/db/vpostgres/pg_stat_tmp
20K /storage/db/vpostgres/pg_subtrans
4.0K /storage/db/vpostgres/pg_tblspc
4.0K /storage/db/vpostgres/pg_twophase
81M /storage/db/vpostgres/pg_xlog
20K /storage/db/vpostgres/postgresql.conf
4.0K /storage/db/vpostgres/postmaster.opts
4.0K /storage/db/vpostgres/postmaster.pid
0 /storage/db/vpostgres/serverlog
143G total
|
The directory was full with log files. The log files containted only one message:
|
1
2
|
vcsa:/storage/db/vpostgres/pg_log # more postgresql-2015-03-04_090525.log
123462 tm:2015-03-04 09:05:25.488 UTC db:VCDB pid:1527 WARNING: there is already a transaction in progress
|
The solution
This led me to VMware KB2092127
(After upgrading to vCenter Server Appliance 5.5 Update 2, pg_log file
reports this error: WARNING: there is already a transaction in
progress). And yes, this appliance was upgraded to U2 with high
probability. The solution is described in KB2092127, and is really easy
to implement. Please note that this is only a workaround. There’s
currently no solution, as mentioned in the article.
How to connect/interact with VCVA DB (DB2 and vPostgres)
If
you need to connect/interact with the VC appliance database, for
example to remove the locks of DB2 or performing an script, you can do
the following after being logged in as root via SSH on the appliance:
- On VCVA 5.0 GA with DB2:
1. Turn into the db2inst user:
vcenter:/ # su db2inst1
2. Start the db2 client:
db2inst1@vcenter:/> db2
You'll see a prompt like this:
db2 =>
3. connect to the VCDB database:
db2 => connect to VCDB
(the command is like this, very literal)
4. Change to VC schema:
db2 => set schema vc
5. Perform any command you need. For example, to remove the VPX_SESSIONLOCK lines, you can do like this:
db2 => delete from VPX_SESSIONLOCK
DB20000I The SQL command completed successfully.
You can type "quit" anytime you want to exit from the db2 client, and "exit" when you want to go back to root userspace.
- On VCVA with vPostgres:
1. Connect to the database using psql:
vcenter:/ # /opt/vmware/vpostgres/1.0/bin/psql -U vc -d VCDB
You'll see a prompt like this:
psql (9.0.4)
Type "help" for help.
VCDB=>
2. Perform any command you need (selects, inserts, etc). For example, to list all tables:
VCDB=> \dt
There are a lot of new tables in 5.1, (mainly the vpx_hist_stat* ones).
To quit, just type "\q"
DB20000I The SQL command completed successfully.
Type "help" for help.
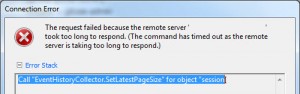
vCenter Appliance – Call “EventHistoryCollector.SetLatestPageSize” for object “SessionID” on vCenter Server failed.
When using the vSphere Client to connect to the
VMware vCenter Server Appliance was appearing every now and again.
Call “EventHistoryCollector.SetLatestPageSize” for object “SessionID” on vCenter Server “ServerName” failed. (unfortunately didnt take a screenshot, so here’s one I found and modified).
This issue is pretty common, and is to do with the amount of events in the database not being purged, and is covered by VMware in this KB article for windows environments.
However not so commonly covered for the vCenter Appliance which uses a progress database.
After a bit of digging around, I found the following crude solution on the VMware communities board.
So open up a console to your VCSA, login in. Run the following commands
Here are the steps:
References:
https://communities.vmware.com/thread/80738
http://www.educationalcentre.co.uk/vmware-5-1-vcenter-appliance-call-eventhistorycollector-setlatestpagesize-for-object-sessionid-on-vcenter-server-failed/#more-418
http://kb.vmware.com/selfservice/microsites/search.do?language=en_US&cmd=displayKC&externalId=2054085
http://kb.vmware.com/selfservice/microsites/search.do?language=en_US&cmd=displayKC&externalId=2056968
Call “EventHistoryCollector.SetLatestPageSize” for object “SessionID” on vCenter Server “ServerName” failed. (unfortunately didnt take a screenshot, so here’s one I found and modified).
This issue is pretty common, and is to do with the amount of events in the database not being purged, and is covered by VMware in this KB article for windows environments.
However not so commonly covered for the vCenter Appliance which uses a progress database.
After a bit of digging around, I found the following crude solution on the VMware communities board.
So open up a console to your VCSA, login in. Run the following commands
/opt/vmware/vpostgres/1.0/bin/psql -d VCDB vc
TRUNCATE TABLE vpx_event CASCADE;
then to exit “/q”
Here are the steps:
- First of all - stop VPXD
- service vmware-vxpd stop
- connect to DB:
/opt/vmware/vpostgres/1.0/bin/psql -d VCDB vc
You will be prompted for the "vc" password which is not the same as the
root password.
Password is in "/etc/vmware-vpx/embedded_db.cfg" file
- issue this commands:
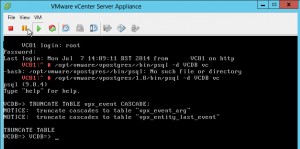
- TRUNCATE TABLE vpx_event CASCADE;
- TRUNCATE TABLE vpx_event_arg CASCADE;
- TRUNCATE TABLE vpx_task CASCADE;
- quit DB command line
- issue the command "/q "
- start the VPXD
- service vmware-vxpd start or restart vCSA appliance
- Check the size of VCBD. Now the size is only 165MB
- VCDB=> SELECT pg_database.datname, pg_size_pretty(pg_database_size(pg_database.datname)) AS size FROM pg_database;
- datname | size
- -----------+---------
template1 | 5289 kB
template0 | 5281 kB
postgres | 5385 kB
VCDB | 165 MB
(4 rows)
References:
https://communities.vmware.com/thread/80738
http://www.educationalcentre.co.uk/vmware-5-1-vcenter-appliance-call-eventhistorycollector-setlatestpagesize-for-object-sessionid-on-vcenter-server-failed/#more-418
http://kb.vmware.com/selfservice/microsites/search.do?language=en_US&cmd=displayKC&externalId=2054085
http://kb.vmware.com/selfservice/microsites/search.do?language=en_US&cmd=displayKC&externalId=2056968
VMware vCenter Server Appliance Error: VPXD must be stopped to perform this operation.
http://www.virtualizationteam.com/management-automation/vmware-vcenter-server-appliance-error-vpxd-must-be-stopped-to-perform-this-operation.html
Error: VPXD must be stopped to perform this operation.
This error has came up while trying to change authentication to active directory authentication and kinda seen the same error when trying to change the database to an external database. For some reason the Server service stop button is shadowed as well which mean I could not stop it by the GUI interface. Although my lab setup is not ideal and it might just due to the way I set it up, though I will still document how I resolved this where the same mechanism can be used to stop and restart any other service used by the vCenter Server Appliance. Below are the steps I have followed:
1- SSH to your VMware vCenter Server Appliance using the root account.
2- Execute the following command to see the status of all the service running in the vCenter Appliance: chkconfig
The output of all services will look something like below:
localhost:~ # chkconfig
after.local off
apache2 off
arpd off
atftpd off
auditd on
autoyast off
chargen off
chargen-udp off
cron on
daytime off
daytime-udp off
dbus on
dcerpcd on
dhcp6r off
dhcp6s off
dhcpd off
discard off
discard-udp off
earlysyslog on
echo off
echo-udp off
eventlogd on
fbset on
gpm off
haldaemon on
haveged on
irq_balancer on
kbd on
ldap on
lsassd off
lwiod on
mdadmd off
multipathd off
netlogond on
netstat off
network on
network-remotefs on
nfs on
ntp off
pcscd off
powerd off
random on
raw off
rpasswdd off
rpcbind on
rpmconfigcheck off
sendmail on
servers off
services off
setserial off
skeleton.compat off
splash on
splash_early on
sshd 235
stunnel off
syslog on
syslog-collector off
systat off
time off
time-udp off
uuidd off
vami-lighttp 235
vami-sfcb 235
vaos 235
vmware-inventoryservice on
vmware-logbrowser off
vmware-netdumper off
vmware-rbd-watchdog off
vmware-tools on
vmware-vpostgres on
vmware-vpxd on
vsphere-client on
xinetd off
ypbind off
3- Stop the required service in my case was vmware-vpxd using the following command: chkconfig service-name off (ex: chkconfig vmware-vpxd off)
4- carry out your changes
5- Start the service again using the following command: chkconfig service-name on (ex: chkconfig vmware-vpxd on)
Subscribe to:
Posts (Atom)